Welcome to our scarecrow making tutorial! If you’re looking for a fun and creative project to add a touch of whimsy to your garden or fall decor, making your own scarecrow is the perfect choice. In this homemade scarecrow instructions guide, we will walk you through the process of creating your very own scarecrow using simple materials and easy-to-follow steps. Get ready to unleash your creativity and bring your scarecrow to life!
Key Takeaways:
- Gather the necessary materials, including wood strips, screws, wire, old clothes, stuffing, twine, buttons, straw, and art supplies.
- Start by building the scarecrow frame using the wood strips and wire to create a strong backbone and shoulders.
- Dress your scarecrow by using old clothes and shoes to give it character, such as a plaid shirt, bib overalls or jeans, and old loafers or rain boots.
- Stuff the scarecrow with materials like plastic bags, old clothes, or straw, ensuring the arms, chest, and legs are fully filled.
- Add finishing touches, such as a pumpkin head or other object, and display your scarecrow in a visible area for everyone to enjoy.
Building the Scarecrow Frame
To create a sturdy framework for your scarecrow, you’ll need to build the frame using a 36-inch wood strip as the backbone and a 12-inch wood strip as the shoulders. Follow these easy scarecrow making steps:
- Start by attaching the 12-inch wood strip to the top of the 36-inch strip, forming the shape of a T.
- Use wood screws to secure the strips together at the point where they meet.
- Wrap garden wire tightly around the joint to reinforce the connection and provide additional stability.
By following this scarecrow construction guide, you’ll have a solid and reliable frame that will support the structure of your scarecrow. Take a look at the visual illustration below:
| Materials | Tools |
|---|---|
| 36-inch 1×2 wood strip | Wood screws |
| 12-inch 1×2 wood strip | Drill |
| Floral or garden wire |
Refer back to this scarecrow building guide whenever you need to construct a strong and sturdy frame for your scarecrow. Building a solid foundation is essential for the overall stability and durability of your scarecrow.
Dressing the Scarecrow
Now that you have successfully built the frame for your scarecrow, it’s time to give it some personality by dressing it up. This is where the real fun begins! Using old clothes and shoes, you can create a unique and charming scarecrow that will add character to your garden or fall decor.
For a traditional farmer scarecrow, you’ll need a few key items:
- Plaid shirt: Choose a colorful plaid shirt to give your scarecrow a rustic look. You can find one at a thrift store or use one you already have.
- Bib overalls or jeans: Wrap your scarecrow’s lower body in bib overalls or jeans. These will add an authentic touch to its overall appearance.
- Old loafers or rain boots: Give your scarecrow some footwear by using old loafers or rain boots. These can be worn-out shoes that you no longer use.
Here’s how you can dress your scarecrow:
- Hang and button the shirt: Place the plaid shirt on the scarecrow’s frame and button it up. Make sure it hangs naturally on the frame for a realistic look.
- Buckle on the overalls: If you’re using bib overalls, buckle them onto the scarecrow’s waist. This will give it the iconic farmer look. If you don’t have overalls, you can sew or staple a worn-out pair of jeans to the bottom of the shirt to create the illusion of overalls.
- Add shoes: Finally, slide the old loafers or rain boots onto the scarecrow’s feet. This will complete the look and give your scarecrow a finished appearance.
Remember to choose clothes and shoes that fit the size of your scarecrow’s frame. You can also add accessories like a hat or a scarf to enhance its look even further. Let your creativity shine as you dress up your scarecrow!
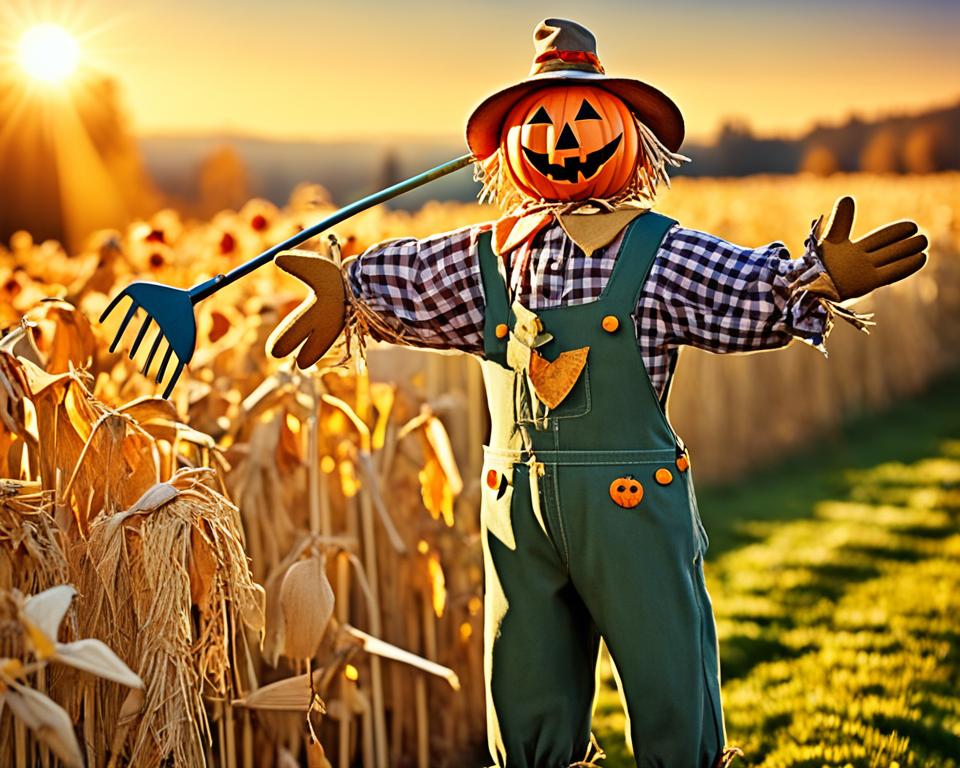
To inspire you, here’s an image of a scarecrow dressed in a plaid shirt, bib overalls, and worn-out boots:
With your scarecrow now dressed and ready to go, it’s time to move on to the next step: stuffing and finishing the scarecrow. Let’s give your scarecrow the final touches it needs!
Stuffing and Finishing the Scarecrow
After dressing the scarecrow, it’s time to stuff it. This step is crucial as it gives your scarecrow its shape and body. Here’s a scarecrow making tutorial on how to stuff and finish your DIY scarecrow:
- Choose the right materials for stuffing: You have several options when it comes to stuffing materials. Consider using plastic bags, old clothes, grass clippings, leaves, crumbled paper, or shredded cardboard. These materials provide both structure and insulation for your scarecrow.
- Start with the arms: Begin by stuffing the arms of the shirt using your chosen materials. Make sure to fill them evenly, giving them a firm yet pliable feel.
- Work your way to the chest: Move on to the chest area, adding enough stuffing to fill the shirt and overalls. This will give your scarecrow a full and realistic appearance.
- Stuff the legs: From the bottom up, stuff the legs of the scarecrow with your chosen materials. Ensure that the stuffing is evenly distributed throughout.
- Tuck straw into the sleeves and neck: Insert handfuls of straw into the sleeves and neckline of the scarecrow’s shirt. This will add a traditional touch and enhance the overall look of your scarecrow.
Once you’re satisfied with the shape and fullness of your scarecrow, it’s time to add the finishing touches.
Adding Shoes
Complete the scarecrow’s look by adding shoes made from old loafers, sneakers, or rain boots. This not only adds a charming detail but also helps anchor the scarecrow to the ground, preventing it from toppling over.
Final Display
Find a suitable spot for your scarecrow, such as a garden bed, front porch, or even a bale of straw. Position it where it can be seen and admired by passersby. Get creative and consider adding accessories like a hat or a pumpkin for the scarecrow’s head to make it truly unique.
With the stuffing and finishing complete, you’ve successfully created your very own scarecrow! Followed this scarecrow making tutorial to make a DIY scarecrow that will add a whimsical touch to your garden or outdoor space.
Conclusion
Making a scarecrow is a fun and creative project that can add charm to your garden or fall decor. By following these step-by-step instructions and using simple materials, you can create a unique scarecrow that reflects your personal style.
Remember to add finishing touches such as a pumpkin or other object for the head, and display your scarecrow in a visible area where everyone can enjoy it. Let your imagination run wild and have fun creating your very own scarecrow!
FAQ
What materials do I need to make a scarecrow?
To make a scarecrow, you will need a 36-inch 1×2 wood strip, a 12-inch 1×2 wood strip, wood screws, a drill, floral or garden wire, scissors, old clothes and shoes, stuffing material, twine, buttons, straw, and art supplies.
How do I build the frame for the scarecrow?
Start by using a 36-inch wood strip as the backbone and a 12-inch wood strip as the shoulders. Attach these two pieces together with wood screws and wrap garden wire around the point where they meet.
How do I dress the scarecrow?
Use old clothes and shoes to dress the scarecrow. For a traditional farmer scarecrow, use a plaid shirt, bib overalls or jeans, and old loafers or rain boots. Hang and button the shirt onto the wood frame, buckle on the overalls, and sew or staple a worn-out pair of jeans to the bottom of the shirt if overalls are not available.
What can I use to stuff the scarecrow?
You can use a variety of materials for stuffing, such as plastic bags, old clothes, grass clippings, leaves, crumbled paper, or shredded cardboard. Start by stuffing the arms and work your way to the chest area, making sure to add enough stuffing to fill the shirt and overalls. Stuff the legs from the bottom and tuck handfuls of straw into the sleeves and neck.
Any tips for finishing the scarecrow?
To finish your scarecrow, add shoes made from old loafers, sneakers, or rain boots. You can also add a pumpkin or other object for the head. Display your scarecrow in a visible area where everyone can enjoy it.